SILEX
MANUAL
FRESH BREEZE
|
|
|
|
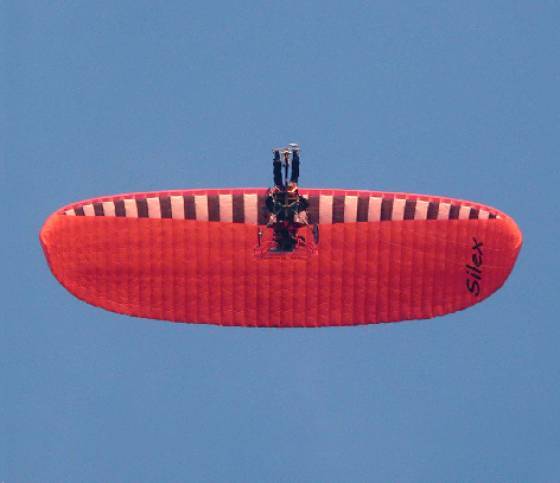
The SILEX is a high performing wing, designed and built utilising the latest results of our profile research. In developing and constructing the SILEX have paid an equal amount of attention to both safety and performance. The SILEX is suited for recreational pilots who fly on a regular basis as well as ambitious cross country pilots. Always remember that a certain amount of flying experience is a pre-requisite for opening up new flying horizons with ample safety reserves. The descriptions of the extreme manoeuvres detailed herein, are to familiarise you with the characteristics of the SILEX. However, we recommend that you try testing the limits of your new equipment slowly and safely. Certain extreme manoeuvres must only be performed at great height or above water with the appropriate equipment (emergency parachute, life jakket), and under supervision. Your "SILEX" has been test flown at the factory and/or by your dealer. Nevertheless, you should initially fly the glider at a training site to check its airworthiness. Choose calm conditions and a safe take-off site. Accident-free and enjoyable flying is far more important than a few additional moments in the air or showing off near the ground. We hope your new "SILEX" will bring you many hours of fun and safe flying. Please do not hesitate to contact us for further information. Your Fresh Breeze Team.
FRESH BREEZE TEL. 05130-3769922 E-MAIL:FRESH.BREEZE@T-ONLINE.DE |
|
|
Pre-Flight Checks
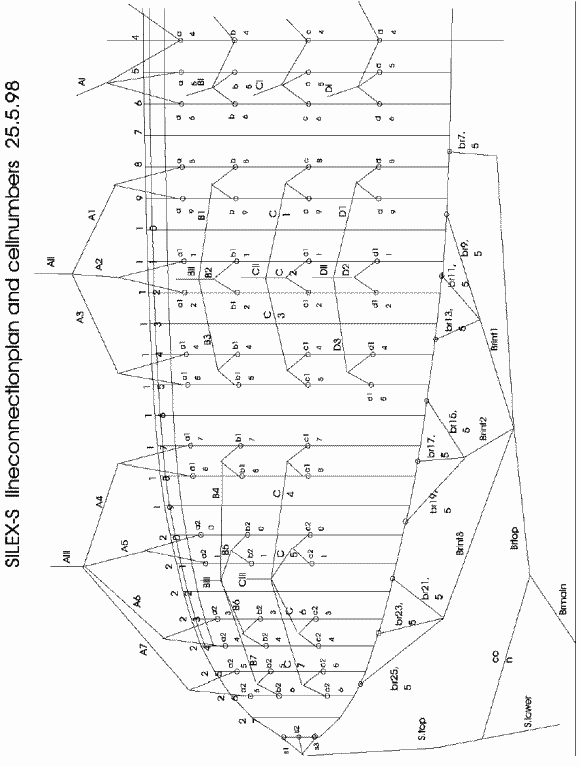
Apart from the usual checks, the following items should be examined periodically. Start at any point and work around the whole canopy checking its sewing, lines, knots and fabric.
|
|
|
Break SettingsThe factory break setting is fixed at a point where the brakes begin to work after approximately 12 cm of travel. You can shorten the length of the break lines to improve the subjective handling, but only by a maximum of 5 cm. Under no circumstances should the break lines be so short as to activate the breaks constantly. This would alter the wings reaction in any manoeuvre carried out during Gütesiegel testing. A lengthening of the breaks is, in principal, not dangerous but the subjective handling of the glider will be poorer. If the breaks are set too long, we recommend wrapping the breaks once around your hands. If you should have any problems, your authorised Fresh Breeze dealer will advise and be of assistance to you.Canopy LayoutWe recommend that you lay the canopy out in an apex or mushroom shape with the underside facing skywards. The leading edge (cell openings) should be facing into the wind. Pull the lines until they are taut and disentangle any lines that are twisted or trapped.LaunchThe SILEX is launched in the conventional way, by pulling on the A risers. Depending on the terrain and wind, the glider should be slowed down slightly, by breaking as it gets overhead.FlightYour SILEX has excellent flying characteristics, yet we recommend that you get to know your glider thoroughly. In this handbook we have divided the flying instructions into three chapters:1. flying characteristics The last chapter deals with the special characteristics of your "SILEX" during extreme manoeuvres, but their execution demands some degree of experience. We strongly discourage acrobatic or 'display' flying and recommend that all pilots participate in safety training. Your dealer will be able to provide further information on safety courses. |
|
|
1. Flying CharacteristicsZero PositionThe "SILEX" comes either with or without the foot-operated speed bar. The canopy has been trimmed in such a way that it is always in the zero position unless you have adjusted it. Zero position is used as a starting point in describing all other positions. Best GlideBest glide is achieved in still air with zero break . The speed system should be used to improve
the glide into wind. As the SILEX has a very flat polar curve the speedtrim can and should
be used frequently. Minimal descentThis can be achieved with 20 -30 % brake. The more brake you apply, the slower the glider becomes and the faster you descend. This is very useful when preparing to land. If you want to do a 'shallow' or 'flat' turn in thermals, brake the "SILEX" on both sides and alter your course within the thermal circle by using your outside brake. "S" TurnsTo enter into thermals or in order to achieve steeper bank angles, only brake the glider on one side. The "SILEX" has no negative tendencies, however, be sensitive to the gliders reaction when doing these turns. Flying in TurbulenceYou should apply slight brake pressure, around 20 %. Try to keep the canopy above yourself by actively adjusting the brakes. This requires some practise, but is essential for safe flying in turbulence. It also prevents wing collapses. Nevertheless, should this happen, it is important to maintain your direction and if necessary steer away from the hillside. You must not attempt to inflate the canopy by "pumping" the brake until the glider is stable and you are flying straight and on the correct course.
|
|
|
AccelerationYou need to practice using the foot-operated speed bar. To be able to control the glider with your feet as well as with your hands is especially important when flying in turbulence. When changing from lift to sink, it is essential to take your foot off the speed bar in order to prevent a possible collapse..
Parachutal StallA stable parachutal stall has not been achieved in test flights. However, should your glider
engage into a continuous descent, give the A risers a short downwards pull until the canopy
resumes its forward flight. 2. Rapid Descent TechniquesBig EarsThe "SILEX" has optional "big ears" which accelerate your forward descent to approximately
4 m/ps.
B-line StallB-line Stalls are an excellent method of rapid descent (up to 10 m/ps). To induce a B-line Stall,
grip the B-lines above the B-riser carabiners and pull both risers down evenly. Resistance will
decrease as your hands. The wing will fold along the B-line links and your rate of descent will
increase noticeably. Front StallThe rate of descent will increase to up to 8 m/s when a full front stall is implemented. Due
to the rapid descent and the difficulties experienced in controlling a symmetrical recovery, it
is recommended that this manoeuvre is avoided. The recovery from a front stall is aided by
application of brake pressure. |
|
|
SpiralsThis glider is made for easy and big spirals. It is possible to achieve a rate of descent of up
to 15 m/s in a spiral. To induce a spiral pull down one brake evenly. An increase in pitch
should be associated with this application otherwise one runs the risk of inducing a negative
spin. It is always best to utilise weight shift to the inside of the spiral to support the initiation
of this manoeuvre. Should velocity decrease, re-initiate the manoeuvre, do not just
apply more brake pressure! 3. Extreme Flight ManoeuvresThe following paragraphs describe the characteristics of the SILEX when experiencing extreme manoeuvres in flight. They will assist you in selecting the best way to control the glider in these situations.
Full StallThis may occur:
To achieve the full stall we recommend that you wrap the brake lines around your hands at
least once. Press the brakes down slowly until you stop going forwards. As you keep applying
the brakes the canopy continues to fall backwards. It is vital that you DO NOT RELEASE
THE BRAKES during this phase. The canopy then contracts and stabilises itself above you, its
"ears" pointing forwards.
|
|
|
Negative Turns (Flat Spins)The SILEX is hard to set in this manoeuver.
Negative turns are indicated by the softening of the braked side of the canopy, which then recedes backwards inducing a backward spin. Should you encounter this situation, RELEASE THE BRAKES! The canopy will automatically stabilise itself. Possible collapse of one wing can be countered as described in "flying in turbulence". Asymmetric CollapseAsymmetric collapses usually occur when flying in strong lift or turbulence. The air empties out of one side of the wing and it collapses. The vents will then turn towards the collapsed side. If not stabilised, the SILEXl re-inflate after turning 180°-360°. Braking on the opposite side will prevent the glider from turning. Do not apply too much brake. It is only necessary to prevent the glider from turning. The wing should re-inflate without input, however, you can assist by pumping the deflated side. Remember to keep applying the brake on the opposite side until the wing is stable and flying in the correct direction. Front TuckFront Tucks may occur when flying in very turbulent air. Flying the glider actively - by countering canopy movement through light brake input - will prevent front tucks in most cases. A front tuck will recover independently. By applying some brake on either side you may assist and accelerate the recovery.If possible reduce the power of the motor. LandingTo reduce the forward speed and glide of the canopy when setting up for landing, brake at about 50 %. You achieve a soft landing if you brake continually shortly before touching down.You can land under power or with switched off motor.Do not brake to early. |
|
|
Folding awayWe recommend that you sort the lines and loosely throw them on top of the canopy before folding it up. Folding the canopy from both ends towards the middle has proven to be the most effective and efficient method. You end up with a strip approx. 60 cm wide. Roll this up from the trailing edge to the leading edge and hold it together with the strap provided. The enclosed stuff bag offers additional protection against any damage. TransportThe paragliding equipment is best transported in its own rucksack or carrying case, as sunlight and too much heat can affect the equipment adversely. If transporting your glider by car, please remember that the exhaust can substantially heat up some parts of the boot, which can be damaging to both fabric and lines. For the same reason it is recommended that you do not leave your unprotected equipment under windows where it may be affected by direct sunlight. StorageAll the equipment should be stored away from light in a dry, well ventilated room, and protected
from temperature fluctuations. Rooms where petrol, solvents, or other chemically
aggressive substances are stored are unsuitable. If you will not be flying your SILEX for more
than a few weeks, we recommend that you open the backpack and slightly unroll the glider
to release the tension. This will circulate air around it and allow it to breath. ServicingYour equipment needs constant checking, especially the canopy material, the seams, the
lines, and last but not least, the harness and straps. As part of the guaranteed safety certificate
the producer in Germany is required to check the glider every second year. Checking DataYour glider and especially the lines may become distorted by extreme weather conditions or
excessive use. Should you get the impression that your glider's performance has changed,
please return it to Fresh Breeze or your local dealer for checking. RepairsRepairs to the glider should only be undertaken by the manufacturers or experts recommended by them. In places of minimal stress, small tears up to 3 cm in the sail (but not the seams) may be repaired using approved materials. Do not replace lines or perform repairs using celotape, masking tape or similar products. Please remember that it is always preferable to let your local dealer carry out any repairs on your glider. |
|
|
CleaningShould your canopy ever become soiled, wipe it down with a soft sponge and clear water. If
the dirt is ingrained, use warm water and soap flakes. Ensure the canopy is completely dry
before storing it away. Any cleaning with aggressive chemicals, excessive force, or hot water
weakens the fabric, dissolves the surface finish and renders the canopy useless. If in doubt,
put up with a few blemishes on your canopy and rather ensure that you have a safe and secure
glider. Compatibility with other motorsystemsThe SILEX has to two sets of risers and can be used with any motorunits with two attachment points. Artistic Display Flying
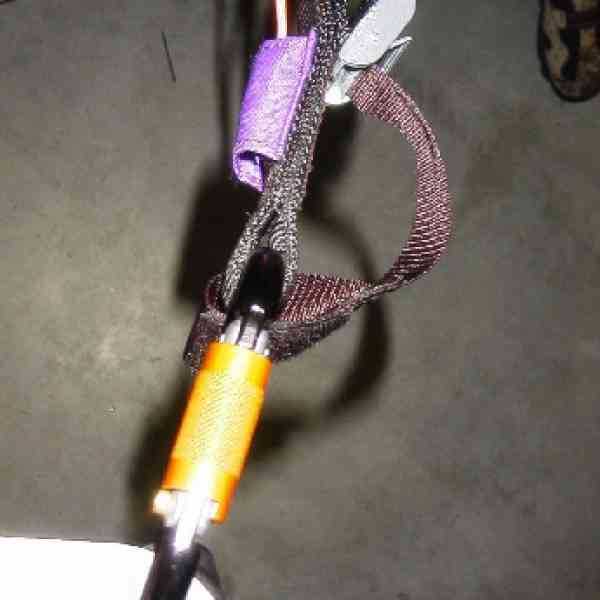
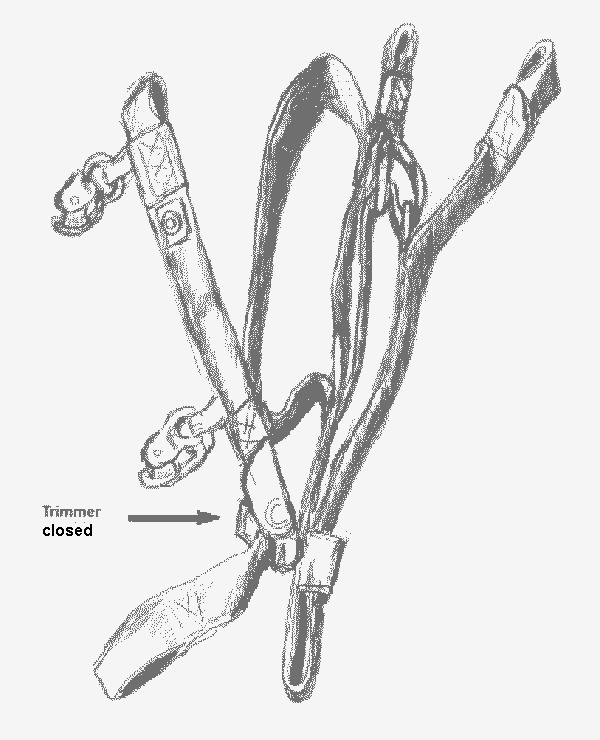
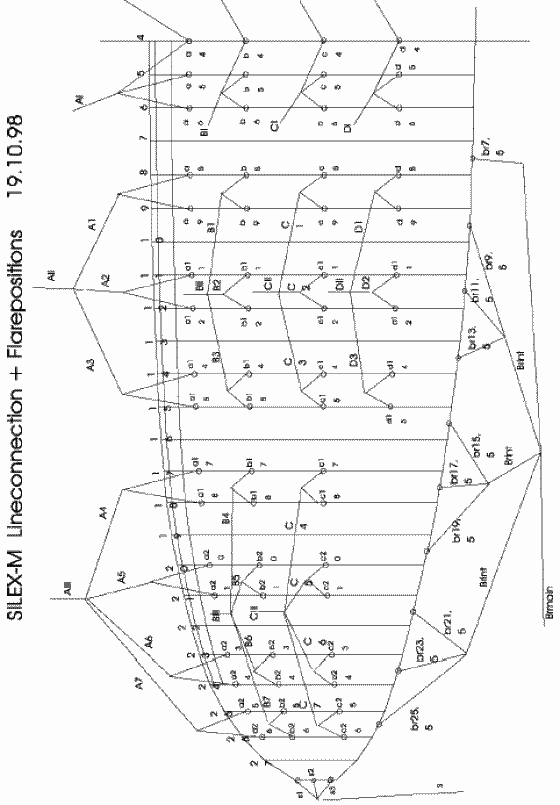
TrimmerThe Silex is equipped with a trimm-system. This compensate the torc which will tranmit from motor to the glider. This means the glider will fly unter power permant a curve. If you open one side you can prevent this. For safety you have to fix the end of the trim into the karabiner spring safety hook. So you can use only a part of the way from the trimm. Look at the picture:
|
|
|
RiserThis riser have a shortend lengh. This is nesscesary to practice the previously described "big ears" and "b-stall". Likewise these system has trimmer (look drawing). Herewith you can:
|
||||
|
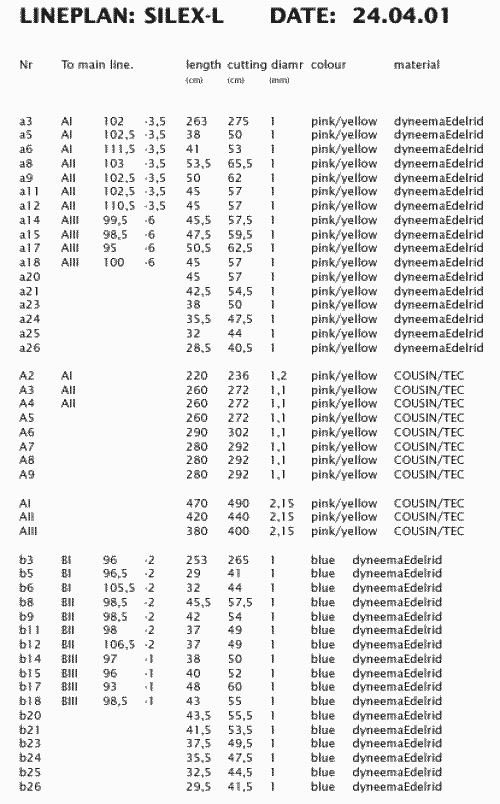
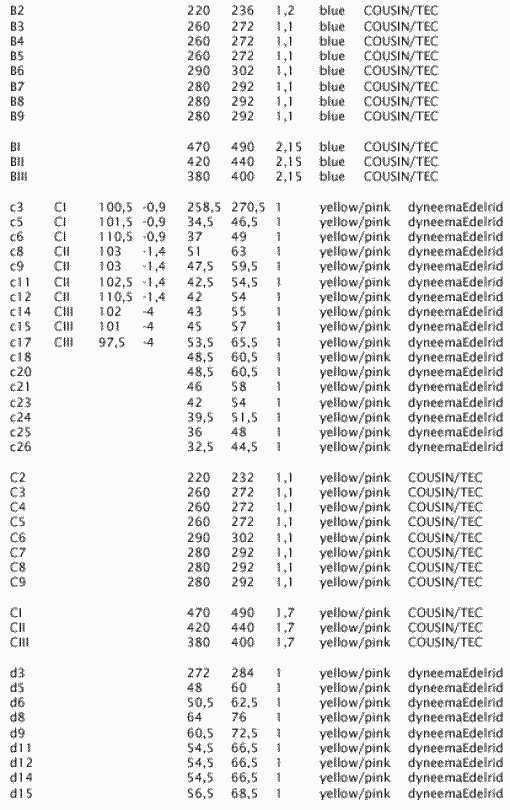
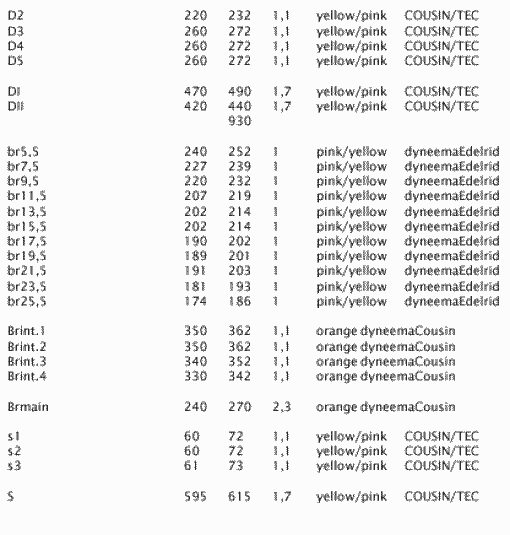
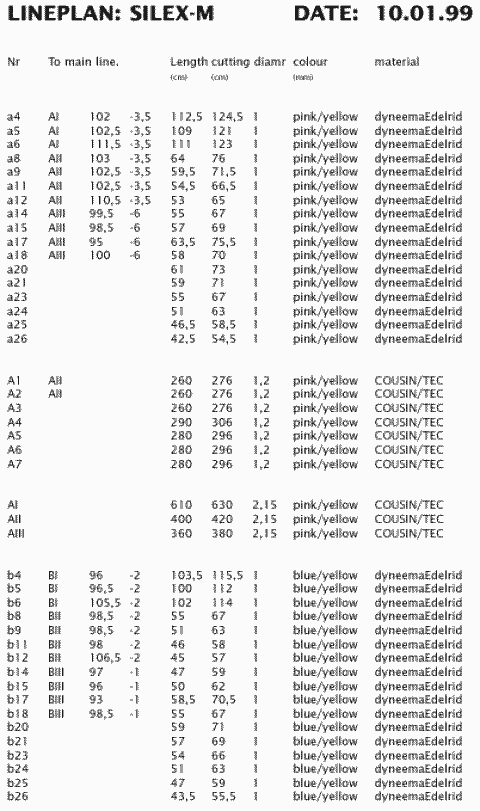
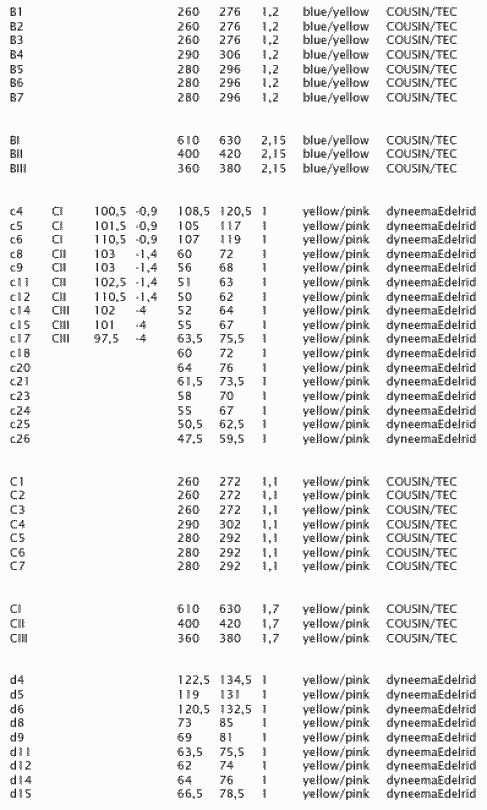
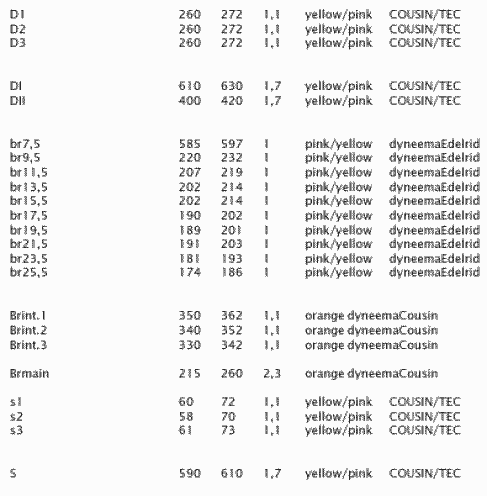
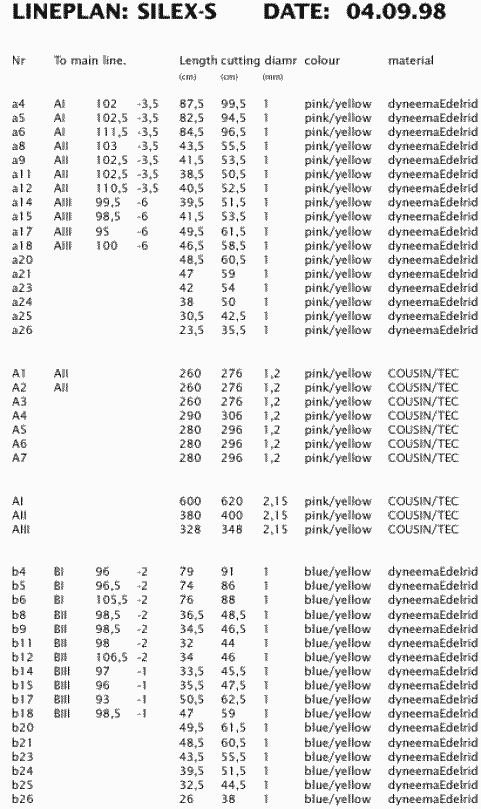
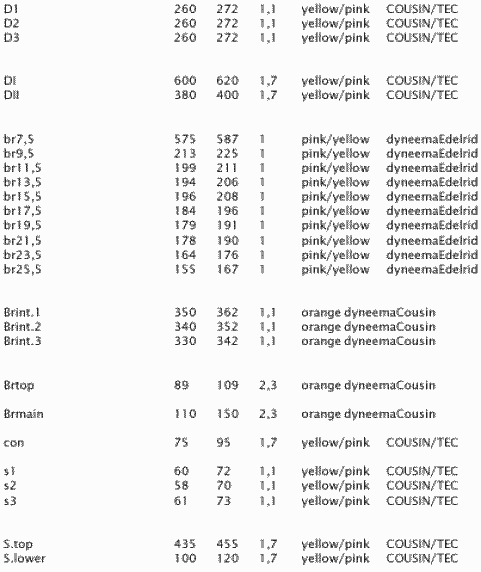
SILEX - Specifications
|
||||||||||||||||||||||||||||||||||||||||||||||||||||||||||||
|
|
|
|
|
|
|
|
|
|
|
|
|
|
|
|
|
|
|
|
|
|
|
|
|

|
|
|
|
|
|
|
|
|
|
|
|
 The "SILEX" is a paraglider only for motor and must not be used as a parachute.